top of page
Max presents a three-section green jacket mould around an ivory owl

Standard mould design software · Windows

Shape the split.
Place the fittings.

Take control when a standard mould layout needs more work. Route the seam, add shell sections and position the practical details around your model.

Standard · £109

First year. Optional renewal £54.50 per year to keep Standard tools.

Everything in Basic, with extra control over the seam, shell sections, fittings and supports.

Is this the right workspace?

For shapes that need more than a standard split.

Standard builds on the Basic mould tools. It is the edition to consider when the join needs to turn around a shoulder, the rigid shell needs another opening direction, or an automatically placed fitting needs moving to a more useful position.

You gain manual and curved seams, three or more shell sections, manual fixing and passage placement, custom supports, and compression or alignment channels. Standard also adds tray, plaque and stamp layouts for flat-backed projects.

These controls help you develop a workable layout around a difficult shape. They do not automatically make an undercut release. The seam, supports, fixings and the direction each section moves still need to be inspected together.

All Basic tools

Keep the core block, glove and jacket workflows.

£54.50 renewal

Optional annual renewal after the £109 first year.

2 design credits

Limited-time launch offer. Printing is separate.

Included tools

What Standard adds to Basic.

Seam control

Manual and curved seams

Guide the split around the shape instead of accepting a simple route. A collar, shoulder or change in contour can be a useful place to inspect. Follow the line all the way around; a neat front seam can still create a difficult join at the back.

Multi-part shells

Three or more shell sections

Divide the rigid support into additional pieces when the shape needs more opening directions. Extra sections also add joins, fixings and assembly work. Choose them because they help release the model, then inspect the complete arrangement.

Placement

Manual fittings and passages

Place fixing and passage features by hand. Move a fixing away from an awkward corner or choose a pour and vent position to suit the intended orientation. Rebuild and review after a change; a clear view from the front does not prove a passage is clear inside.

Supports

Custom model supports

Position supports to hold the master in its intended place. Check the contact area, clearance and removal sequence. A support should hold the model without making the silicone layer or the finished mould harder to work with.

Joins

Compression and alignment channels

Use the additional flange and channel controls to develop how the sections meet. Inspect the available wall around each feature and check the fit with your chosen printer and material before the main pour.

Flat-backed projects

Tray, plaque and stamp layouts

Prepare open-face and flat-backed work as well as supported silicone moulds. Think about the direction a relief lifts out and the depth of the impression. This is a different workflow from Pro’s two-part direct negative around a full model.

A practical walkthrough

Develop a split around your own model.

Build the main shell first, then make the seam and fitting decisions against the actual geometry. Each step below explains a useful review point.

1Start with the size and orientation2Guide the seam around the shape3Choose the number of shell sections4Position the supports and fittings5Review the pour and air routes6Check, export and dry-fit

Import the model and decide how it will stand or lie during the mould-making process. Set the scale before drawing a seam, placing contacts or choosing clearances. Use the Basic mould tools as the starting point.

Choose a manual or curved seam and guide it around the area you intend to split. Inspect the route from the front, sides, back and underside. A natural-looking line is useful only when the rigid sections can also move clear.

Add another section when the shape needs a different opening direction. Review every join created by that decision. More pieces can help a difficult model, but they also need alignment, fixings and a sensible assembly sequence.

Place the custom supports and fixing features where they can do their job and remain accessible. Check the silicone space around contacts. Move a fitting if it crowds a seam junction or another feature, then rebuild.

Position passages for the orientation you will actually use. Look for places where air may collect and inspect the route through the built geometry. Automatic suggestions and manual positions both need checking after the model or split changes.

Build the updated design, review warnings and inspect how the sections open. Export the parts to your slicer, check the print layout and print a suitable fit test where needed. Assemble the printed shell before adding silicone or casting material.

Inside the softwareSaved test build
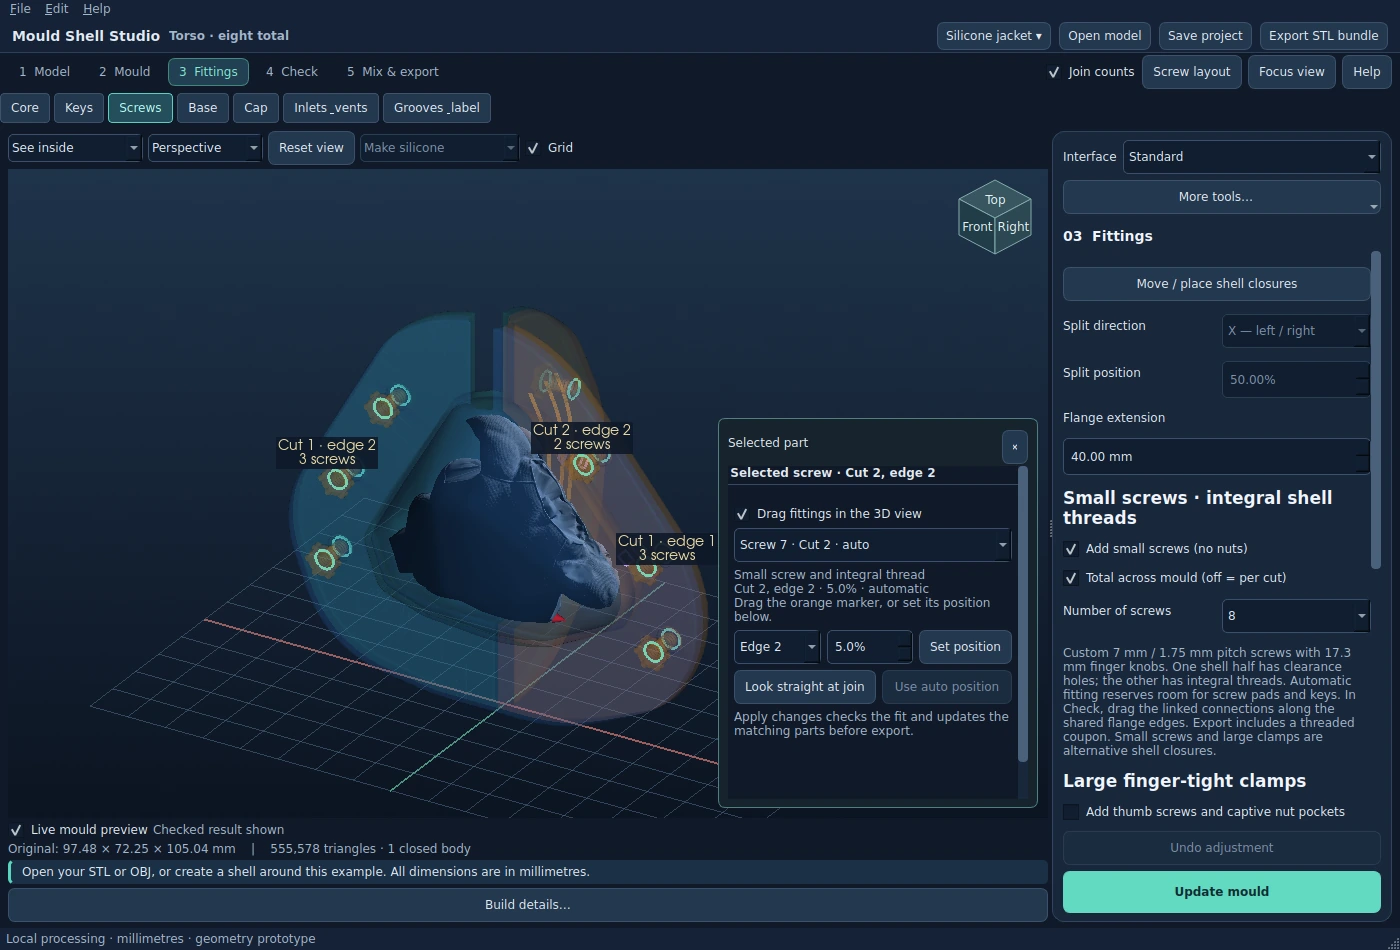
Saved Mould Shell Studio shell and fixing layout interfaceEnlarge interface ↗

Example interface from a saved test build. Layout and available controls depend on the release and edition.

Illustrated opening demonstration

Inspect before you print

Check how the rigid sections move apart.

The green parts are printed supports. The blue silicone is the flexible mould. Check the path the rigid sections need to follow, then check how the silicone can flex away from the master.

Pause demonstration
Rigid printed shellFlexible silicone mouldMaster or cast

Also included in Standard

A different workflow for flat-backed work.

Tray, plaque and stamp projects have an open face or a clear impression direction. Choose the outline, border and depth around the relief, then inspect how the finished piece can lift out.

A shallow-looking design can still contain a lip or recess that catches. Check the raised detail and the edges before treating it as an easy open mould.

Illustration of a flat-backed mould project. Full-model two-part direct negatives are a separate planned Pro workflow.

Max reviews an illustrated split suggestion beside a lighthouse model

Optional online AI mould planner

A second opinion on the layout.

Ask for suggestions about orientation, shell splits and fill openings. Review the advice against the model and use the ideas that suit your project and licensed tools.

Connect your own OpenAI API key. With permission, Studio sends six rendered views, dimensions, settings, your instructions and relevant build errors for advice. The STL stays on your PC. API usage may incur separate charges.

In development: automatic recommendations for mould type, part count and seams that follow detail still need review. The separate Model Editor uses photo-assisted selection for a different task.


Choose with the full picture

What Standard can and cannot do.

Use the scope below to match the tools to your project. The right edition still needs a workable shape, suitable settings and a physical fit check.

Your taskWhat the tools provideThe limit or next step
Follow a different seam routeManual and curved seams are included.The software does not guarantee that a clothing seam or sculpted crease is the best mould opening.
Use additional shell sectionsThree or more sections and manual layout controls are included.You still need to check pull directions, fixing access and assembly order.
Place fittings and supports manuallyManual fixing and passage placement, custom supports and channel controls are included.A valid digital feature still needs suitable dimensions and a physical fit check.
Create flat-backed mould projectsTray, plaque and stamp layouts are included.A two-part direct negative around a full 3D model is planned for Pro.
Remove and key a part of the masterImport a model prepared for your chosen split.The Model Editor and keyed part separation are planned Pro features.
Reuse production presets or build a hollow coreUse the Standard mould design and manual controls.Hollow-casting cores, production presets and workshop export packs are planned for Pro.

Before you install

A Windows PC and a practical printing workflow.

Windows and project size

Studio runs on 64-bit Windows PCs with an Intel or AMD processor. Windows 11 x64 is the tested platform. There is no native Mac or Linux release.

Simple mould jobs were tested on a 7th-generation Core i7 with 8 GB RAM and integrated graphics. Detailed scans and large meshes need more memory headroom. This is a tested example, rather than a minimum specification for every project.

Setup, slicing and materials

Use your own slicer to prepare the exported parts for your printer. Check the actual bed size, orientation, supports and material settings there. Supply the printer, silicone, casting material and assembly hardware for your project.

Initial setup, account activation and periodic licence checks need internet access. Installation steps depend on the release. See licences, downloads and support for the current download instructions.

The useful details

Questions before you begin.

Does Standard include everything in Basic?

Yes. Standard adds its extra tools to the core mould layouts, import, silicone estimates, standard fittings and printable shell export included in Basic.

What happens if I do not renew Standard?

Standard includes its extra tools for one year. The optional renewal is £54.50 per year. If you do not renew, you can continue with the eligible Basic features. Designs that use higher-edition tools may require that edition to rebuild or export those features.

Does a curved seam automatically follow clothing or facial detail?

A manual curved seam gives you control over the route. Automatic seam recommendations are still being developed and tested. You need to review the proposed route and the removal direction, particularly around faces, hair, sleeves and deep undercuts.

Will adding more sections always improve the mould?

No. More sections can help a trapped area release, but they create extra joins, fixings and assembly work. Check whether the extra opening direction solves a real problem before adding complexity.

Can Standard edit the imported model itself?

The planned Pro Model Editor is the workspace for selecting, separating and keying parts of the master. Standard concentrates on the mould layout around the model. You can import an already prepared model for mould design.

What is included in the launch design offer?

The limited-time launch offer includes two design credits with Standard. Printing is separate. A simple design and a fitted two-part shell can use different numbers of credits; ask for an assessment before committing credits to a complex project.

Your next step

Take control of the mould layout.

Standard includes all Basic tools, curved seams, extra shell sections and manual placement controls. The first year is £109, with an optional £54.50 annual renewal for Standard tools.

Standard · £109

First year. Optional renewal £54.50 per year to keep Standard tools.

Sign in or create your Studio account to buy. The software download is available after payment. Printing and casting materials are separate.

Enlarged software interface
bottom of page