Block mould
Create a box around the master and fill the surrounding space with silicone. This can be a simple approach for compact pieces with a manageable release direction.
A larger box can use more silicone. Check the estimate before deciding.
 Menu ☰

Basic mould design software · Windows
Start with your 3D model. Design a mould box or supporting shell, check the fit and export the parts for your own 3D printer.
Basic · £49
Includes one year of updates. Keep using your eligible Basic version afterwards.
Mould it with Max. The core mould tools, without an annual requirement to keep using your eligible Basic version.
Is this the right workspace?
Basic is for makers who already have a 3D model and want to make a physical mould around it. Import an STL or OBJ, set the size and orientation, and build the rigid parts that contain or support the silicone.
You can work with a block mould, a thin silicone glove and its support, or a fitted jacket layout. The software creates printable geometry and helps estimate silicone. You still choose a suitable master, print the parts, prepare the mould and carry out the casting process.
A compact ornament is a useful first project. A figure with a hooked arm or a large projecting wing may need a more involved split or a separately prepared master. Choose the edition around the shape you need to release, rather than the detail level alone.
Import the model you want to reproduce.
Basic includes 12 months of updates.
Limited-time launch offer. Printing is separate.
Three core approaches
The printed parts contain or support the silicone. The silicone takes the impression of your master. The best arrangement depends on the shape and the way it can open.
Create a box around the master and fill the surrounding space with silicone. This can be a simple approach for compact pieces with a manageable release direction.
A larger box can use more silicone. Check the estimate before deciding.
A relatively thin silicone skin follows the master. The printed support helps the flexible mould keep its shape while you pour the next cast.
A thin glove still needs suitable thickness, support and a practical way to remove it.
Build a closer-fitting rigid jacket around a shaped silicone layer. Open the printed sections, then flex the silicone away from the model detail.
A close fit saves space, but the rigid sections must still be able to move clear.
Illustrated mould examples. The layout of your own mould depends on the imported model and settings.
A practical walkthrough
Follow the same decisions you will make in the desktop software. Select a step for practical guidance; the saved interface image shows the mould workspace.
Open your STL or OBJ and confirm its dimensions. Check the model for loose pieces or obvious surface problems. Set the intended scale before choosing the silicone space or making fitting decisions.
Compare the block, glove and jacket approaches with the shape of your master. Start with a simple layout and think about which direction the rigid sections and the flexible silicone will move when you open the mould.
Choose a rigid shell wall and the allowance around the master for silicone. Inspect thin passages and detail. A small estimate is only useful when there is enough room for a workable mould.
Review the standard alignment and fixing features around the split. Look for access to each fixing and check that the sections meet as intended. Choose Standard if you need to position fittings by hand or change the seam route.
Build the geometry and rotate the result. Look at the underside, narrow gaps and projecting details, as well as the front. Address the reported issues and check how each section would actually lift away.
Export the printable shell parts and open them in your own slicer. Check the bed size, orientation and supports there. After printing, dry-fit the sections and fixings before committing silicone to the assembled mould.
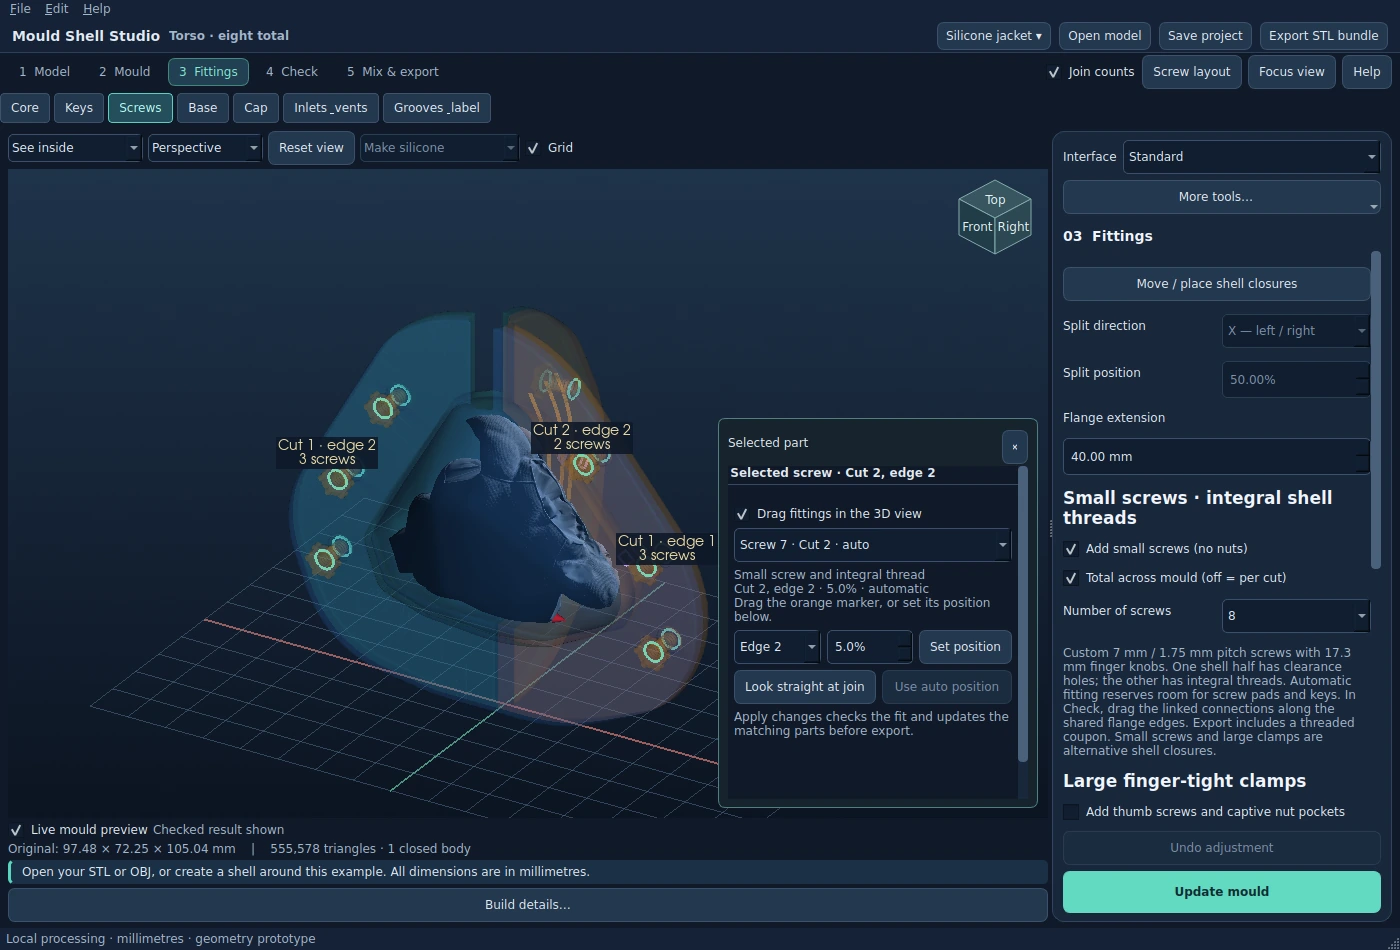 Enlarge interface ↗
Example interface from a saved test build. Layout and available controls depend on the release and edition.
Inspect before you print
The green parts are printed supports. The blue silicone is the flexible mould. Check the path the rigid sections need to follow, then check how the silicone can flex away from the master.
Pause demonstrationIncluded tools
Check dimensions, scale and orientation before building. An upright pose may make sense for a statue, while another orientation may give a simpler mould opening. A change in scale changes material quantities and clearances too.
Control the rigid wall and the space reserved for the silicone layer. They are different materials with different jobs. Inspect narrow areas and projecting detail before reducing either allowance.
Use the standard fitting workflow to help shell sections locate and stay together. Inspect the joins and access to the fixings. Free placement of fittings, custom supports and compression channels belong to Standard.
Orbit the preview and inspect the sections together and apart. Work through reported build findings, then export the printable parts for your normal slicer. Passing digital checks is followed by a physical fit check.

Optional online AI mould planner
Ask for suggestions about orientation, shell splits and fill openings. Review the advice against the model and use the ideas that suit your project and licensed tools.
Connect your own OpenAI API key. With permission, Studio sends six rendered views, dimensions, settings, your instructions and relevant build errors for advice. The STL stays on your PC. API usage may incur separate charges.
In development: automatic recommendations for mould type, part count and seams that follow detail still need review. The separate Model Editor uses photo-assisted selection for a different task.
Choose with the full picture
Use the scope below to match the tools to your project. The right edition still needs a workable shape, suitable settings and a physical fit check.
| Your task | What the tools provide | The limit or next step |
|---|---|---|
| Make the core silicone mould layouts | Block, glove and jacket workflows, with silicone estimates and printable shell export. | The model still needs a suitable opening and physical mould-making preparation. |
| Change the seam or add more opening directions | Use the standard Basic layout. | Manual or curved seams and three or more shell sections require Standard. |
| Position every fitting yourself | Use the standard fitting workflow. | Manual fixing and passage placement, custom supports and compression channels require Standard. |
| Separate a wing, garment or head from the master | Import the prepared model you intend to mould. | Model editing and keyed part separation are planned Pro features. |
| Make a direct negative or hollow core | Design the core silicone mould support layouts. | Two-part direct negatives, hollow-casting cores and plugs are planned for Pro. |
| Finish the physical cast | Export the digital shell geometry and estimate silicone. | A slicer, printer, suitable silicone, casting materials and hands-on assembly are separate. |
Before you install
Studio runs on 64-bit Windows PCs with an Intel or AMD processor. Windows 11 x64 is the tested platform. There is no native Mac or Linux release.
Simple mould jobs were tested on a 7th-generation Core i7 with 8 GB RAM and integrated graphics. Detailed scans and large meshes need more memory headroom. This is a tested example, rather than a minimum specification for every project.
Use your own slicer to prepare the exported parts for your printer. Check the actual bed size, orientation, supports and material settings there. Supply the printer, silicone, casting material and assembly hardware for your project.
Initial setup, account activation and periodic licence checks need internet access. Installation steps depend on the release. See licences, downloads and support for the current download instructions.
The useful details
Basic costs £49 and includes 12 months of updates. You can keep using your eligible Basic version after that update period. Account activation and periodic licence checks still apply.
The purchase is for Windows software. You print the rigid shell or box and supply the mould-making materials. The launch design credit is a design service benefit; printing is charged separately.
No. Begin with an STL or OBJ model. Reference-photo selection belongs to the separate AI-assisted Model Editor workflow; it does not turn an ordinary photo into a complete new 3D model.
No. Undercuts, projecting parts and deep recesses can require a different split, more sections or changes to the master. Detailed texture and difficult release geometry are separate issues.
No. Ordinary mould building starts with your model file. The optional online mould planner can offer advice when configured with your own OpenAI API key. You review the suggestions, and the edition limits still apply.
Check the printed fit, fixing access, silicone space and the intended opening direction. Confirm the silicone and casting process are suitable for your master and printed materials. The volume estimate helps plan a mix; it does not replace the material supplier’s mixing instructions.
Your next step
Basic includes the core mould layouts and one launch design credit. Print the shell on your own printer and keep the eligible Basic version after the included update year.
Includes one year of updates. Keep using your eligible Basic version afterwards.
Sign in or create your Studio account to buy. The software download is available after payment. Printing and casting materials are separate.
Keep exploring