top of page
Maya and Max present a prepared wing, bust mould and casting core as an illustrated Pro workshop scene

Pro edition · Coming soon

Prepare. Mould.
Repeat.

Prepare the master, explore advanced casting layouts and keep useful production settings together. Pro brings the model and mould workflows into one studio.

Pro · £199 planned first year

Coming soon. Planned optional renewal £99.50 per year. Pro is not currently on sale.

Pro preview. The planned edition combines all Standard tools with model preparation and workshop features.

Is this the right workspace?

From a difficult master to a repeatable workshop project.

Pro is the planned edition for makers who need to work on the master itself as well as the mould around it. A projecting wing can be separated and keyed before mould design; a hollow casting can need a removable core; a repeat job can benefit from saved production settings.

The planned toolset builds on Standard. It adds the Model Editor, two-part direct negative moulds, hollow-casting cores and plugs, actual shell-layout comparisons, reusable presets and workshop export packs.

This page explains the intended Pro scope. Pro is coming soon, and the AI model-selection and automatic seam-planning work is still in testing. Examples are provided so you can understand the workflow and its limits before deciding which released edition you need.

All Standard tools

The planned Pro edition includes the lower-edition toolsets.

Coming soon

£199 planned first year; £99.50 planned optional renewal.

3 planned credits

Planned launch design benefit. Printing is separate.

Workspace preview

The tools planned for Pro.

Model preparation

Model Editor and keyed separation

Select a surface region, inspect it in 3D and preview the cut. Add a matching key and socket so a removed part can locate again. Manual tools refine the selection; reference-photo AI helps identify a target such as clothing or hair. The dedicated Editor page explains the full process.

Direct casting

Two-part direct negative moulds

Create opposing negative cavities around a complete model and inspect the split, alignment keys, pour opening and vents. The result needs a shape and casting process that can release from rigid printed halves. A deep undercut can still trap the casting.

Hollow casting

Hollow-casting cores and plugs

A core occupies space inside a casting cavity so the finished part can have a hollow interior. Plan the core opening, supports and removal path together. An enclosed core needs a real way out; reducing material volume alone does not make the arrangement workable.

Layout review

Compare actual shell layouts

Build two-, three- and four-section jacket or glove casing trials and compare recorded build findings and material estimates. The comparison uses a limited set of trial layouts. It helps a decision; it does not prove that a chosen arrangement is the best possible seam or the least-waste design.

Repeat projects

Reusable production presets

Save useful dimension and feature preferences for another project. Model orientation, seam routes and placed supports are tied to a particular shape and need fresh review. A preset is a starting point for a new build, rather than proof that the old layout fits a different model.

Workshop handover

Workshop export packs

Keep printable parts, part inventories, assembly illustrations, project information and recorded warnings together. The pack helps take a checked digital project into the workshop. Its exploded illustrations identify parts; their display offsets are not validated physical withdrawal paths.

Maya presents an illustrated dragon with a separated wing

Model preparation

Start with the part that makes the mould difficult.

A projecting wing can obstruct a shell opening. The planned Editor lets you inspect a surface selection, preview the separation and give the removed part a matching joint.

AI can help identify the region from reference pictures. Check the result in 3D and refine it before cutting. A good prepared master can make the later mould layout more manageable.

Illustrated part-separation concept. Actual selection tests appear on the Editor page.

Compare the opening options

More parts is a decision to test.

The planned Pro comparison builds actual trial layouts in the desktop software. Use their results to compare build findings and material estimates, then inspect the geometry yourself.

2-section trial3-section trial4-section trial

Two sections

A simple arrangement to assemble and inspect. It may still leave a hooked or recessed region trapped, so look at both the model and the intended withdrawal paths.

Three sections

An additional section can offer another opening direction around an awkward feature. Check the new seam junctions, fixing access and order in which the sections will be removed.

Four sections

More sections can separate complex regions, while adding joins and assembly work. Compare actual findings and estimates; the highest part count is not automatically the most useful layout.

The trial set covers specific two-, three- and four-section jacket or glove casing layouts. It does not search every possible curved seam, parting line or orientation.

A practical walkthrough

Plan the whole project before committing material.

Pro adds decisions about the master and the casting process. These steps show how those decisions connect to the existing mould workspace.

1Inspect the master and plan the job2Prepare difficult parts in the Editor3Choose the mould or casting approach4Build and compare useful alternatives5Check the core, routes and assembly6Save preferences and export the workshop pack

Start with a model at the intended scale. Look for parts that obstruct a mould opening, areas that need to stay detailed and any reason to use a hollow casting. Decide which operations need their own review before building the shell.

For a projecting feature, select the intended surface and inspect all sides. Refine the boundary, preview the separation and check the key and pull direction. Keep a saved original and inspect the prepared pieces before using them for mould design.

Use the Standard shell tools around the prepared master, or explore the planned direct negative workflow for a suitable shape. For hollow casting, plan the core and its opening together with the casting orientation.

Use the available layout trials to compare actual build results. Check warnings, silicone estimates, rigid material estimates and the number of parts. Inspect the geometry yourself; a smaller material figure can still come with an awkward opening.

Review supports, pour and vent routes, fixing access and the order of removal. A core must clear its opening. An exploded preview and passed geometric checks are useful evidence, followed by a hands-on fit and process review.

Save suitable reusable preferences and export the project information with the parts. Check the slicer setup for your actual printer, then dry-fit the printed components. Retain warnings and the relevant assembly information with the job.

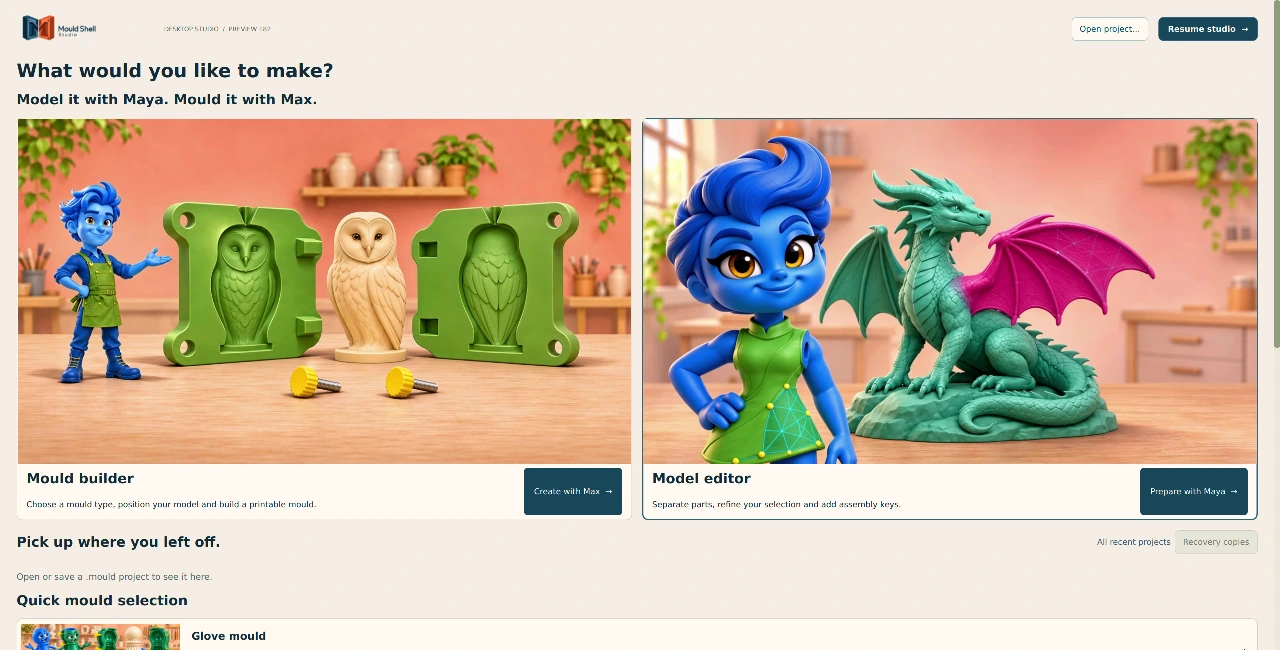
Inside the softwareSaved test build
Saved Mould Shell Studio workspace launch screenEnlarge interface ↗

Example interface from a saved test build. Layout and available controls depend on the release and edition.

Max reviews an illustrated split suggestion beside a lighthouse model

Optional online AI mould planner

A second opinion on the layout.

Ask for suggestions about orientation, shell splits and fill openings. Review the advice against the model and use the ideas that suit your project and licensed tools.

Connect your own OpenAI API key. With permission, Studio sends six rendered views, dimensions, settings, your instructions and relevant build errors for advice. The STL stays on your PC. API usage may incur separate charges.

In development: automatic recommendations for mould type, part count and seams that follow detail still need review. The separate Model Editor uses photo-assisted selection for a different task.


Choose with the full picture

What Pro can and cannot do.

Use the scope below to match the tools to your project. The right edition still needs a workable shape, suitable settings and a physical fit check.

Your taskWhat the tools provideThe limit or next step
Edit the master and key removed partsPlanned Model Editor tools cover selection, separation and matching joints.You must inspect selection boundaries, joint dimensions and the way each part pulls away.
Use AI to select a featureReference-photo AI is being tested for identifying targets and mapping selections onto the STL.Shadows, occlusion and similar colours can produce missed or unwanted areas. Manual correction remains part of the workflow.
Build a direct negative around a full modelA two-part direct negative workflow is planned for Pro.Rigid cavities cannot release every undercut. Casting material and printed-mould compatibility need checking.
Plan a hollow castingCores, plugs and associated support arrangements are planned.A core needs a suitable removal route. A trapped core is not solved simply by making the outside mould open.
Compare alternatives and reduce wasteActual layout trials and material estimates help compare the available options.The trials are limited. There is no guarantee of the globally best split or a minimum material use.
Repeat a job or pass it to the workshopPresets and export packs preserve useful preferences and project information.Reused settings need a fresh build and review on each model. Exported instructions do not certify a casting process.

Before you install

A Windows PC and a practical printing workflow.

Windows and project size

Studio runs on 64-bit Windows PCs with an Intel or AMD processor. Windows 11 x64 is the tested platform. There is no native Mac or Linux release.

Simple mould jobs were tested on a 7th-generation Core i7 with 8 GB RAM and integrated graphics. Detailed scans and large meshes need more memory headroom. This is a tested example, rather than a minimum specification for every project.

Local AI and installation

Local AI selection needs the required model setup and suitable hardware. The 8 GB example for simple mould building is not an established AI-editing minimum. Check the requirements for the released AI package before choosing a PC for it.

Initial setup, account activation and periodic licence checks need internet access. Installation steps depend on the release. See licences, downloads and support for the current download instructions.

The useful details

Questions before you begin.

Can I buy Pro today?

Pro is coming soon. The planned first-year price is £199, with an optional £99.50 annual renewal. This is a preview of the intended toolset; Basic and Standard are the currently available Windows editions.

Will Pro include the lower-edition tools?

The planned Pro edition includes the Basic and Standard toolsets, then adds model preparation and production features. The overview page keeps the edition comparison in one place.

Is AI fully automatic model preparation?

No. The aim is to get a useful starting selection quickly. You still need to inspect all sides, refine missed or unwanted areas, and review the proposed cut and joint. The current tests do not establish a universal accuracy percentage.

Does the layout comparison find the perfect seam?

The comparison builds a set of two-, three- and four-section jacket or glove casing trials. Those trial layouts are a limited search. A manually routed seam around the particular model can still be more suitable.

Can I use any model for a direct negative mould?

The geometry must be able to release from the chosen rigid halves. Deep recesses, hooked features and branching shapes can need a different split or a flexible silicone approach. Review the actual cavities and the material process before printing.

Will presets copy all my seam points and supports?

Production presets reuse suitable feature and dimension preferences. Coordinates that belong to one model, such as seam routes and support locations, need fresh attention on another shape. Rebuild and inspect the new project.

Is the Model Editor a separate purchase?

The current edition plan places the Model Editor in Pro. The dedicated Editor page explains that workspace in detail. A separate Editor purchase is not offered on these pages.

Your next step

Explore Pro before it launches.

Pro is coming soon. Review the planned tools, explore the dedicated Model Editor page, or compare Basic and Standard if you need the released mould software now.

Pro · Coming soon

Coming soon. Planned optional renewal £99.50 per year. Pro is not currently on sale.

Planned first-year price £199. Planned optional annual renewal £99.50. There is no Pro purchase button while the edition is coming soon.

Enlarged software interface
bottom of page